Tuesday, February 25, 2014

Chocolate Banana Pineapple Pie

One of my friends is from Hawai'i and shared this recipe with me from cookinghawaiianstyle.com   I love tropical flavors and so I have been waiting for the time when I could make this pie.  The combination of bananas and chocolate and pineapple...  Mmmmmm!!!


The first thing you can say about this pie is that it is ... beautiful!!  It is considered a  Low Sugar  dessert since I have yet to find any sugar free graham crackers and there is a small amount of brown sugar Blend in the crust.  So here's what you do...


  •  1 c. graham cracker crumbs
  • 1/6 c. Splenda brown sugar blend
  • 1/4 c. I Can't Believe It's Not Butter, melted
  • 1 c. sugar-free chocolate syrup
  • 2 medium to large bananas, firm
  • 8 oz. reduced fat cream cheese
  • 2 pkg. sugar free vanilla pudding
  • 3 c. 2% milk
  • 12 oz. crushed pineapple, drained
  • 8 oz. sugar free Cool Whip


 Mix first 3 ingredients for crust and press into the bottom of a pie plate.  Bake at 325 degrees for 6-8 minutes to set.
Now you can probably tell from my picture that I decided to use an already prepared graham cracker crust.  I just happened to have a reduced-fat crust in my pantry and decided to use it.  While it tasted fine, when I make this pie again, I will make my own crust, simply because the pre-made crust was not large enough and it did not hold the entire filling.  As a matter of fact, it didn't even hold half.  What I may try is doing a one and half times the recipe for the crust and make this in a 9x9 pan, so that it is deep enough to hold the entire filling.
Next, pour the chocolate syrup and spread over the entire crust.  I took a second before measuring the syrup and sprayed my measuring cup with a little cooking spray, so that the syrup came out easily.
 Slice your bananas.  Make sure that they are not too thick or too thin.  Layer them all over your chocolate syrup.

Whip together cream cheese & pudding mix and then slowly add milk.  I felt like this mixture didn't quite smooth out.  Tastes wonderful, but the cream cheese didn't seem to fully mix in.  Next time, I will mix the pudding mixture with the milk in a separate bowl and allow it to start thickening.  Then after whipping the cream cheese to lighten it a bit, slowly add in the pudding.  I believe this will allow for a smoother filling.
Pour filling over the banana layer.
Drain pineapple.  This is an extremely important step.  If you have some kind of strainer, I might open the pineapple before you begin the rest of the pie and let it set over a bowl and drain until you are ready for it.  Don't throw that pineapple juice away!!!  It mixes in to make a great smoothie!
Sprinkle the pieces of crushed pineapple over the top of your filling.
At this point, I allowed the pie to set up just a bit in the fridge; 30-45 minutes.


 Finally, top your pie with with the Cool Whip and drizzle with some additional chocolate syrup.


Allow the pie to firm up just a little longer in the fridge.  Serve and enjoy.....

Thanks Jennie W!!!!  Can't wait to try this with some fresh Hawai'ian pineapple!

Wednesday, February 12, 2014

Cake Balls

Wow!!!  How time flies!  I guess that I baked so much during the holidays that I have kind of been on a hiatus the last few weeks.  I just didn't realize that it has been a month since I posted a recipe.  That just won't do.
So, another holiday is hitting us this week and with my daughter away at college, I just decided that I should send a small care package.  I remember being in college and it was always nice to get anything in the mail... even a card.. but a care package... WOW!!!  I think that my daughter feels the same and I try to send her something a few times a year.
Since it is Valentine's Day, I thought I would try for a more elegant look and decided on cake balls.  I had tried to make them before, and while they tasted good, just didn't stick together the way they should have and were a little messy and crumbly.  So I made a phone call to my sister, who I knew had had some success with these in the past.  What she let me know is what she had learned from our mom, work with the cake while it is still warm, so I did just that and they turned out great!


First you need to decide on the flavor for your cake balls.  I decided on strawberry since I knew they would turn out pink and I was looking for something pretty.  You can choose a box of sugar-free Jell-o powder or a container of quart size drink mix in the flavor of your choice and add it to your cake mix to create the flavor of choice.


  • box of sugar-free cake mix (yellow or chocolate)
  • box of sugar-free Jell-o or quart-size drink mix
  • 1 c. lower fat milk
  • 3 eggs
  • 1/3 c. vegetable oil
  • can of sugar-free frosting (vanilla or chocolate)
  • package of vanilla flavored candy coating (almond bark)
  • 2 T. vegetable shortening
  • sprinkles of your choice
Add the cake mix and the flavoring powder of choice to your mixture.  As I mentioned earlier, I went with a yellow cake mix and a box of sugar-free strawberry Jell-0.  Add the eggs, oil and the milk instead of water as directed on the package.  The milk will bring a richness to your cake mix.  I usually have 2% milk in my fridge, but whatever you have is fine.

 After you have mixed well, spray a 9 x 13 pan and add your cake mix and bake according to package directions.  Remember that you are going to crumble this cake up, so it really doesn't matter what you bake it in.  A 9 x 13 just seems easiest to me, but if you don't have one, or if you prefer, you can use round cake pans too.
 Once the cake is done, take it out of the oven and allow it to cool for a few minutes.  This is the secret... let it cool just enough so that you can handle it, but make sure that the cake is fairly warm.  Crumble the cake into a large mixing bowl.  The best tool is your hands.  Just crumble the cake until it is in pretty small pieces.
Next, add the can of frosting and use a wood spoon or spatula and mix the frosting into the crumbs.  With the cake being somewhat warm, this will allow the frosting and the cake to "melt" together and become a good consistency.
 Once you have the cake and frosting well mixed, form into small balls and put on a sheet on waxed paper.  You can either form these by hand or use a small meatball scoop.  The size is really a personal preference.
Put the sheets of cake balls into the freezer to harden.  This will only take about 45 minutes to an hour.  But if you want to do this in stages, this is a great place to stop.  Once they are frozen, you can store these in an airtight container in the freezer until you are ready to dip them in the outer coating.
 When you are ready to dip them, use a double boiler, or I just use a small saucepan and a glass bowl.  Put water in the pan and turn the heat to medium high.  Make sure your bowl is not touching the water or your candy coating will scorch.  You should chop the coating into smaller pieces so that it will melt more quickly.  Add a couple of T. of shortening to the coating to thin it down a little and make your dipping easier.  Stir occasionally until melted and smooth.
If you want to make this a completely  Sugar-free  dessert (and I know that is normally my goal)  you should use a package of sugar-free chocolate chips.  I usually add some parafin slivers, about a 1/4 stick, to my chocolate to help thin it out and make it glossy.  But this was all about the pretty and I very much wanted to use the white; so I settled for a  Low-Sugar  recipe since there is obviously sugar in the candy coating.
 Once your coating is melted, turn the heat down on your water just to keep it simmering and keep your coating melted.  Bring your cake balls out of the freezer.  I like to use a toothpick to dip my candies.  I just feel like I can get the coating all over the entire piece.  Be sure to shake it well and remove any excess coating.
One of the things that I have started doing in the last year is tilting my bowl towards me.  This allows the coating to pool deeper and it makes it easier to dip.  Be especially careful not to get your fingers in the hot coating.
 Set your coated cake ball back on the waxed paper.  If you would like to add a little sprinkle, do so at this point, so that it will stick before the candy coating starts to set up.
I usually work with 2 toothpicks.  By the time I have used the second one, the first one has set up enough that I can twist the toothpick out fairly easily and use it on the next one.  It seems I have to get new toothpicks after 20 or 25 cake balls.
Afterwards, set your tray into the fridge or back into the freezer and allow the coating to set up well.  I usually store these in the fridge until I am ready to serve.  They will keep in the freezer for quite some time if you keep them in an airtight container.
Since I am a chocoholic, this was a nice change for me and I hope my daughter finds them the same.
However, now my mind is reeling... chocolate cake with cherry Jell-0 powder and chocolate icing, dipped in chocolate...  Nothing says "I love you" quite like chocolate covered cherries!  Maybe I should make just one more batch.

Saturday, January 11, 2014

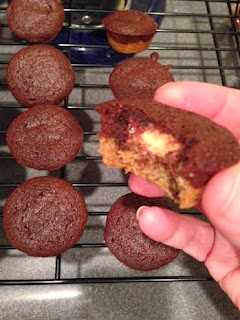
Brownkies


Like many of you, there are tons of recipes showing up daily on my Facebook feed.  Some of them don't interest me at all, and then there are those that I just can't wait to try!  Especially the sweet ones... I immediately look at the list of ingredients and see if I think I can "de-sugarize" it.  Well, this one certainly fit all conditions, and I am happy to share it with you.
It came from someone named Wesley Jueckstock and he named them "Heaven".

 I agree with his description, especially when warm.  But to give people a little better idea of what they are...I am naming them Brownkies... half brownies, half cookies.
  • 1 recipe of low-sugar chocolate chip cookie dough
  • 1 recipe of sugar-free brownies
  • 3-4 bags of sugar-free Reese's Mini Peanut Butter Cups
First, here's my recipe for Chocolate Chip Cookies.  Because there is some brown sugar blend in this recipe, it makes the overall recipe  Low Sugar.

  • 2/3 c. shortening
  • 1/4 c. Splenda Brown Sugar Blend
  • 1/2 c. Splenda
  • 1 egg
  • 1 t. vanilla


  •  1 1/2 c. flour
  • 1/2 t. salt
  • 1/2 t. baking soda
  • 1 t. baking powder
  • 4-6 ounces of sugar-free chocolate chips
Mix together the wet ingredients.  Stir in the dry ingredients just until combined.  Add chocolate chips and mix in.

Note:  If you would like to make chocolate chip cookies from this dough:  Bake at 335 degrees, spray the pan.  Flatten out small balls of dough to the size that you want your cookies.  They will not spread out like regular cookies.  Bake for 11 minutes.  Allow to rest (finish cooking) on the cookie sheet for a few minutes before moving to a cooling rack.


 Press a little bit of chocolate chip cookie dough in the bottom of each muffin cup in a mini muffin tin.  Unwrap individual mini sugar-free Reese's peanut butter cups and turn them upside down, pressing down slightly.
Mix a prepared sugar-free brownie mix according to package directions, adding an egg, oil and water.  Mix just until dry ingredients are combined.
 Scoop a small amount of brownie batter into each muffin cup, allowing the batter to cover each peanut butter cup.  Bake at 350 degrees for 15-18 minutes.  Allow to cool in the pan for a few minutes.
You can use the tines of a fork to gently pry each brownkie out of the muffin tin.  Move to a cooling rack.

I suggest that you eat them/ serve them while warm!  They are "Heaven" and will melt in your mouth.  If they have sat around and have come to room temperature... 10 seconds in the microwave will warm them back up.

I won't say that they are "equally" delicious...  but they are also very good, even if you don't have any of the peanut butter cups to put in the middle.  Chocolate Chip Cookies and Brownies... what could be bad??  But my take is that they still need to be warm.

Thursday, January 9, 2014

Citrus Cranberry Bread

For me, right after pumpkin, cranberry is the other most important holiday flavor.  I have kind of gotten in to using dried cranberries this last year, and although growing up I never liked cranberry sauce at Thanksgiving, this year I made some fresh cranberry relish and really enjoyed it.  So I bought some more cranberries after Thanksgiving and was looking for ways to use them.

I saw someone making lemon cranberry bread on tv and of course I could not remember who.  I started searching for a recipe and found one on the Food TV site for Betsy's Lemon-Cranberry Bread.  I used this recipe as a base for my changes. (I just went back to share the link with you and the recipe doesn't seem to be there.) I used fresh cranberries and along with the lemon, this was a very tart bread.  It was delicious, but if you prefer something a little sweeter, you may want to substitute orange in this recipe.  I made it a second time and did just that.  The other thing that I did the second time was to cook the fresh cranberries for a few minutes.  It did change the complexity of this recipe.  Both were wonderful, just different.  This bread does have a glaze and because it was the holidays, I did use regular powdered sugar.  Therefore, this is a   Low Sugar  recipe.  If you would like to make it a  No Sugar Added  recipe, simply make the glaze from a powdered sugar substitute.


  •  2/3 c. I Can't Believe It's Not Butter, softened
  • 1 1/2 c. Splenda
  • 1/2 c. no-fat, plain yogurt
  • 4 T. lemon or orange juice
  • 2 T. lemon or orange zest
  • 4 eggs
  • 3 c. flour
  • 3 1/2 t. baking powder
  • 1 1/2 t. salt
  • 1 c. low-fat milk, 1% or 2%
  • 2 c. cranberries, dried or fresh*
  • 1 c. pecans or walnuts, chopped  (optional)
Glaze

  • 3 large spoonfuls powdered sugar
  • fresh citrus juice


 Cream butter, Splenda, juice and zest.  Add eggs one at a time, mixing well after each one.
In a separate bowl, combine dry ingredients.  Then add the dry ingredients alternately to batter with milk, starting and ending with the dry ingredients.
 Stir in cranberries and nuts.  Spray 2 loaf pans.  I was making some gifts for the holidays and had some mini loaf pans.  This recipe will make between 4 and 6, depending upon the size of your pans.
Bake at 335 degrees for 1 hour for the regular loaves or 40 minutes for mini loaves.
 Cool in the pan for 10 minutes.  Remove from pan to a wire rack.  Use a skewer, or other sharp object and poke 12 or so holes into the loaf.  Cool the bread completely.
 Whisk together the glaze by adding the juice to the powdered sugar just a little at a time, until you have a thin, pour-able consistency.

For powdered sugar substitute:  Mix 1 c. non-fat dry milk, I c. cornstarch, and 2/3 c. Splenda
 Spoon glaze over the bread allowing it to soak into the holes.  You may want to put some wax paper under your wire rack, just to make clean up a little easier.
 This bread has a refreshing taste and with the red color of the cranberries, it certainly is festive for the holidays,  But I think it would be good any time of year.
*The second time I made this bread, I decided to cut down on the tartness of the cranberries.  I put them in a small skillet with about 1/3 c. Splenda and a T. of lemon juice.  I cooked these down for about 10-15 minutes on a medium-low heat.  The cranberries will burst open and the sugar will dissolve.  Allow the cranberries to cool before adding to the batter.

Thursday, January 2, 2014

Crustless Hot Fudge Pie

I had some friends over for lunch the other day and was looking for a new and easy dessert.  I looked through some recipes that I had seen and written down; I settled on this one.  It had come across in a shared format on my FB feed.  I found it at the following link.  It took no time at all to mix up and we were able to eat it warm.


  • 1 stick I Can't Believe It's Not Butter, softened
  • 1 c. Splenda
  • 2 eggs
  • 1 t. vanilla
  • 3 T. cocoa powder
  • 1/2 t. salt
  • 1/2 c. flour
Cream butter and Splenda for 3 minutes.  Add eggs and vanilla and mix in well.  Finally add the dry ingredients and stir until combined.  (This recipe originally called for 1 t. salt.  It was just a little too salty for my taste, so above I have reduced the amount to 1/2 t.)
 It doesn't look like much batter, but is enough for this small pie.  It will make 6 regular size dessert pieces.  Spray an 8" pie plate and pour in the mixture.
 Heat oven to 335 degrees and bake for 30-35 minutes.  Allow to cool for just a few minutes.  You will want to eat it warm.
I just happened to have some sugar-free ice cream in the freezer...  It was the perfect addition to make it very delicious!

Monday, December 30, 2013

Cinnamon Rolls

This may be the true meaning of decadence.  Cinnamon Rolls have always been one of my favorites, but I certainly want the inside ones that are gooey all the way around!  My exciting news on the cooking front this holiday season is that I was able to purchase a Kitchen Aid mixer.  I have wanted one for a while, and finally with sales, rebates, coupons and found money... let's just say I got a deal that couldn't be beat!  The morning after I came home with my mixer, my husband let me know on his way out the door, that I had better make something with that new mixer.  I know how to follow orders!  I decided to make these cinnamon rolls.  It's an interesting recipe, because it starts with a cake mix.  This is one of those recipes that I have had for so long, that I have no idea where it came from.  After making a few adjustments, this will be a   Low  Sugar  recipe as we will need to use some brown sugar.


  • 2 1/2 c. warm water
  • 2 pkgs. yeast
  • 1 sugar-free yellow cake mix
  • 4 1/2 c. flour
  • I Can't Believe It's Not Butter
  • Splenda Blend brown sugar
  • cinnamon
  • raisins (optional)
  • chopped nuts  (optional)
  • 8 oz. cream cheese
  • 1/2 c. Splenda
Dissolve yeast in warm water. Remember, I was wanting to try out my new mixer, so I just did this in my mixing bowl and put the dough hook on.  If you don't have this option, any mixing bowl is fine.

 Add the cake mix and flour, then knead.  Let dough rise in a warm place until double.
 Roll dough out on a floured board or counter into a 1/4" thick rectangle.  Spread with a layer of the I Can't Believe It's Not Butter.  For all of these filling ingredients, there are no set amounts; just decide how gooey you want your cinnamon rolls and how well you like the other ingredients and judge the amounts accordingly.  Next top with the Splenda blend brown sugar, cinnamon and nuts & raisins if you like them.  Roll up the dough, beginning at the wide side.  Seal well by pinching the edge of the dough into roll.
 Cut into slices about 1 or 1 1/2 inches thick.  Place into a buttered baking dish.  You will want to space them apart a little to give them some room to rise.  I had enough rolls for a 9 x 13 pan, as well as a round cake pan.
Let them rise a second time in a warm place; approximately 1 hour.
Bake at 345 degrees for 20-22 minutes.
You can stop here, but....
 I thought maybe a little icing was in order.  Put one 8 oz package of cream cheese in a mixing bowl and whip it until light and fluffy.  Add 1/2 c. Splenda and mix well, just to give it a little sweetness.
 Spread a little bit of the icing on each roll while they are still warm.  This will allow the icing to melt a little and ooze down in between the layers.
Mmmm, ... mmmm, ... good!

Saturday, December 28, 2013

Peanut Butter Balls

As I was making all of my Christmas goodies, the Oreo balls came out so well, that I started thinking about Peanut Butter Balls.  In the past, I have made them with Nutter Butter sandwich cookies, but since I haven't found those in a sugar-free format as of yet...(we can always hold out that some day they will arrive on the scene)...I needed to try and figure out how I could come up with that.
I looked through the sugar-free cookie section at the store and found some vanilla sandwich cookies.  I started thinking that maybe peanut butter and cream cheese are "approximately" the same consistency, so here is what I came up with:

  • 2 packages of sugar-free vanilla sandwich cookies  (in a regular recipe of Oreo cookie balls you use an entire package of Oreos - or 32 cookies; the vanilla cookies I bought came about 18 or 20 to a package and were just slightly smaller in size, so I used two packages; I might have eaten a couple of cookies from the package)
  • 3/4 package (6 ounces) of reduced-fat cream cheese; softened
  • 1 large scoop (you are looking to equate the other two ounces of the cream cheese) 
  • 1 package of sugar-free chocolate chips
  • 1/4 stick of paraffin; shaved
Start by adding your cookies to your food processor.  Pulse until your cookies become fine crumbs.


 Add the softened cream cheese in small chunks, and add your large scoop of peanut butter.  I just used regular peanut butter, which has a small amount of sugar.  If you would like to make this a completely sugar free  recipe, you could use an all natural peanut butter.
Pulse as you start and then turn on a medium low speed and allow to work until mixture turns in a dough.

You may have to work it just a little with your hands if you find some pieces of cream cheese have not completely mixed in.
Wrap dough in plastic wrap and put into the fridge for a few hours or overnight.
Follow the steps for making out and dipping the balls in chocolate from my Oreo Balls recipe.

I got lots of compliments on these at this year's Christmas Eve party.  If you don't tell them, no one will ever know they are a Low Sugar recipe.