Well, we had to address this issue sooner or later. Christmas goodies...or more specifically, Christmas chocolates. Ever since I remember, my mom made two kinds of candy at the holiday time: Marshmallow Cream Fudge and Martha Washington Fudge. Honestly, it just wouldn't be the holidays with these two candies. Sure, she made some other things as well...peanut brittle among them and so far as the reviews go, that was great too. But I didn't ever like it much, so I have always focused on the chocolate.
I wish that I could tell you that I had amazingly found a way to make both of these candies sugar free...but alas, I just don't think it is possible. If you caught my earlier post about the fudge disaster gone right, you know that I did give it a try, but Marshmallow Cream Fudge is so dependent upon the structure of the sugar to make the candy. And then there is Martha Washington Fudge.. a strange name I know, and I have no idea why it is named that, only that my mom got the recipe in the early 70's from a friend and neighbor. This fudge is made specifically with a large quantity of powdered sugar...and well, we have discussed the powdered sugar issue before.
So this year, just as every other year in the history of my life, I have made these two decadent desserts to give out to friends and family and have tried to limit my consumption. It is hard, but since my surgery, I do have to be mindful, or my tummy will not be happy with me.
Surely, there is a way to make some decadent chocolate candies for the holidays and stay in the sugar-free zone...Why, "Yes" Virginia, There Is!
A few years ago, Oreo Balls appeared on the scene. Our family was introduced to these amazing tidbits of decadence one Christmas Eve by one of my nephew's girlfriends. I didn't have words... and then when I found out how easy they are to make... well that is one winning combination. Then you can use your imagination and the combination of different cookies and chocolates...Oreos and white chocolate chips...Nutter Butter cookies and milk chocolate chips... mint Oreos and white almond bark with peppermint extract... you get the idea. Now, earlier this year, when I discovered the sugar-free Oreos, these Oreo Balls were the first thing that popped into my mind... I just can't tell you how excited I was; my family would probably tell you that I kind of lost it.
So without further ado:
- 2 packages of sugar-free Oreos (you need two packages to equal the number of cookies in a regular package)
- 1 8oz package of reduced fat cream cheese
- 1 8oz package of sugar-free chocolate chips
- 1/4 stick of paraffin, shaved
Start by putting all of your cookies into the food processor.
(Well, maybe you can eat 1 or 2) Pulse until the cookies become fine crumbs.
Of course, if you don't have a food processor, you can always put them into a large zip bag and pulverize them with your rolling pin... you may want to actually do this if you need to relieve a little stress.
Let your cream cheese sit out for a bit and soften. Add it in chunks to the food processor. Use the pulse at first to start to incorporate the cream cheese into the cookie crumbs. You will know that it is ready when it all comes together in a large ball of dough.
Empty the dough out onto a large piece of plastic and wrap it up tightly. Refrigerate for a few hours or overnight.
Line a cookie sheet with parchment or wax paper. Use a small spoon or melon baller and make small balls. You will want to roll them in your hands to make them smooth. Do it fairly quickly, as you don't want the dough to warm up too much. These will be pretty rich, so I think you will want to keep the size fairly small.
Put the sheet of balls into the freezer to allow them to harden slightly, so that they won't melt in the warm chocolate.
In a double boiler, or a glass dish over a pan of simmering water, add the chocolate chips and the shaved paraffin.
(I use a vegetable peeler to shave it.) Allow the chocolate to melt and then stir well until smooth.
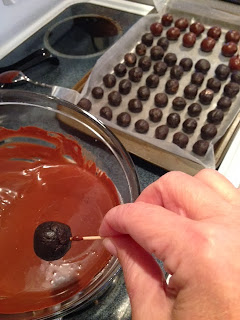
Remove the pan of Oreo balls from the freezer. I like to use a toothpick to dip the chocolates. I also like to tilt my bowl forward to make the chocolate deeper in the bowl. Once you have dipped them, set them back on the paper to set. Work quickly so that the dough does not start to soften.
Return them to the freezer to set; this will happen quickly. You can store these in the freezer or in the refrigerator, although I don't think they will last too long!
So as I was trying to think of some other fun goodies I could make and keep in the sugar free zone, I started thinking about turtles. If you have read some of my other posts, you will remember that I do really love caramel. Why couldn't I use some of the sugar-free caramel ice cream topping with some pecans and then dip them in the sugar-free chocolate chips.
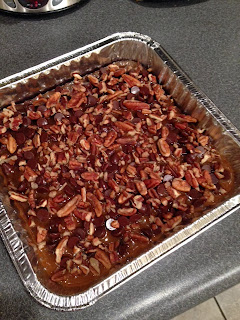
Using a piece of wax paper on a cookie sheet, I put a small spoonful of the caramel and then added 3 or 4 pecan halves. I then placed them in freezer to harden. Well, that's what I thought would happen. Sometimes these items don't react exactly like we think they should. While the caramel did get thick and a little stiff, it didn't "harden" like regular caramel does.
So, after melting some of the chocolate chips with some shaved paraffin, I just used a spoon to add some chocolate to the tops of the turtles. I did leave the pecans peeking out of the side. Another few minutes in the freezer and I used a small icing spatula to flip them over. Again, the caramel wasn't completely hardened so this took a little finesse. I then added some more of the melted chocolate on the other side and returned to the freezer for one last time.
It was necessary to store these in the fridge or freezer to keep the caramel as thick as possible until ready to eat. Now these taste really good, but I think if I make them again, I will start with the chocolate on the wax paper first, and build them up from the bottom; chocolate, caramel and pecans, chocolate. This will be a way to keep the caramel encapsulated. I still think they will need to be stored in the fridge.
The last treat I tried was a peanut butter cup. Flipping through my cookbook, I found where I had written in a copycat recipe for Reese's Peanut Butter Cups. I have had this recipe for more than 20 years, so I am not sure where I got it, or who passed it along to me before the internet was a reality.
- 8 oz Hershey's chocolate (this original recipe called for a Hershey's chocolate candy bar--I substituted the sugar-free chocolate chips; this makes the peanut butter cups a little less sweet than what you might be used to)
- 1 1/2 c. peanut butter (I use Peter Pan; this has a little sugar in it, but I am sure that you could use a natural one and add a little Splenda to get some sweetness)
- Cupcake-full-size or mini -- cut the larger cupcake papers down a bit (I decided to make them using the small mini cupcake papers in a mini muffin tin and didn't worry about cutting down the papers)
So the trick to making these treats is to melt some of the peanut butter into the chocolate. Melt your chocolate with 1/2 c. of the peanut butter. You can use a double boiler or you can melt in the microwave, 30 seconds at a time, stirring until melted and smooth.
Put a spoonful of the melted chocolate into the bottom of each cup. Be sure to only use half of your chocolate mixture. I then put the pan in the fridge and allowed the chocolate to get hard again.
In the meantime, put the last cup of peanut butter in a glass bowl. You can set the peanut butter on a double boiler or just another bowl of warm water, or you can microwave for a few seconds until you can stir it and it has a "pourable" consistency.
Put one spoonful of peanut butter in each cup. Return to fridge and let the peanut butter set up.
Reheat/Remelt your remaining chocolate mixture. Add an additional spoonful as the top layer. Return to fridge one last time to allow chocolate to set up.
I declare these a complete success! As I mentioned earlier, they aren't quite as sweet, but they are very good! With the peanut butter in the chocolate, they will soften a little more quickly so store in the fridge. When you have them out to serve, I don't think they will last long enough to have to worry about them getting messy...but if they do melt a little, I don't think anyone will have trouble just licking the paper!
Who said you can't enjoy some indulgent goodies at Christmas time!


